With Core FTP Pro, you can setup and schedule unattended FTP tasks (sets of transfers) to run anytime you wish (Core FTP Pro must be installed for this feature).
Steps to schedule FTP transfers:
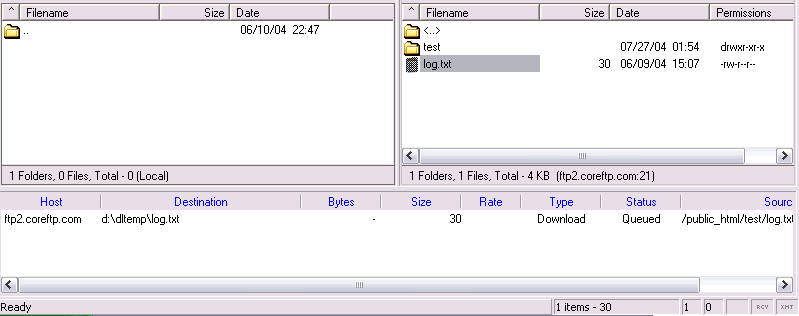
1: Starting
from within the Core FTP application, connect and queue FTP transfers as you normally would
into the Queue Manager (by right clicking on a file and selecting 'queue').
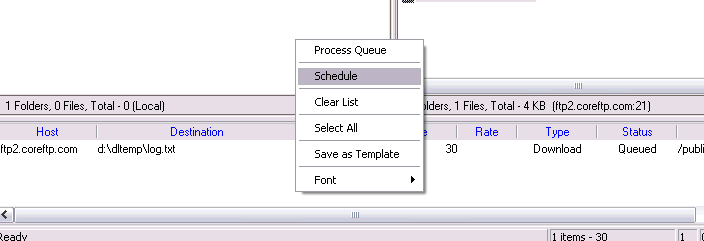
2: Once transfers you would like to schedule in the Queue Manager are queued, right click on the Queue Manager, and select "Schedule".
3: The Core FTP Task Scheduler will then appear and you should see a list of your queued transfers that will now be setup for scheduled FTP transfers.
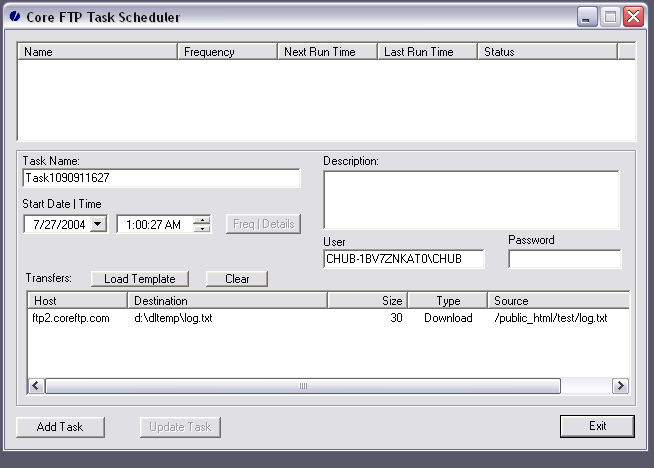
4: (In the Task Scheduler) update the name, description, and first time you wish the task to run, and then click "Add Task". If you are using NT/200x/XP, a password is required for security reasons.
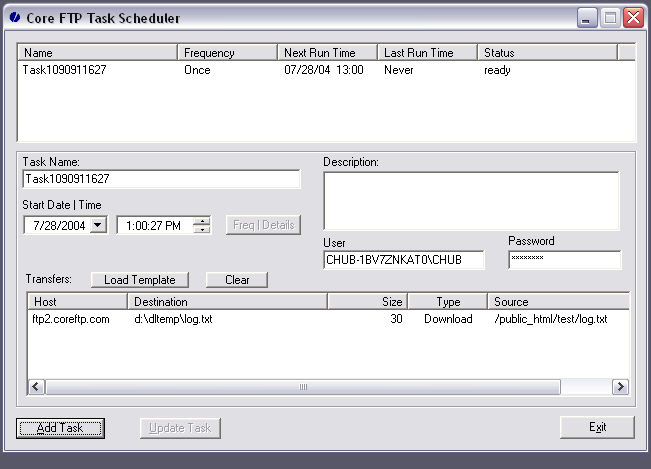
5: A scheduled FTP task should now appear in the task list at the top of the screen.
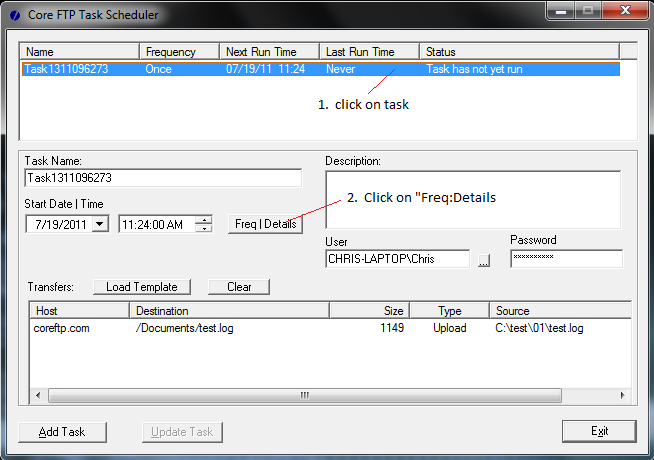
6: Highlite the scheduled FTP task and then select "Freq | Details" to further set the schedule of this task to run daily, weekly, monthly or as you wish.
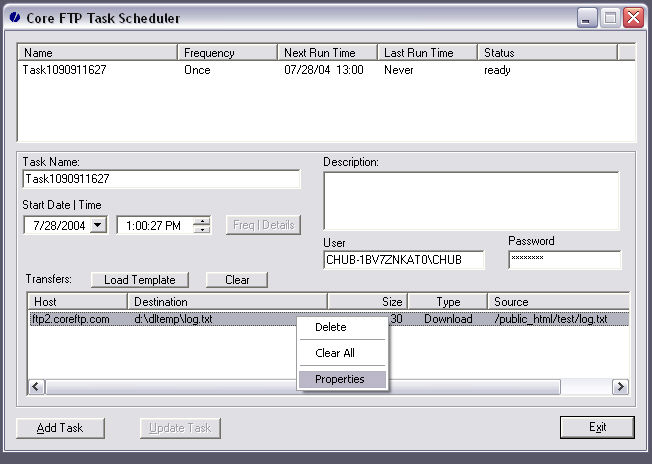
7: To overwrite the destination file when transferring, click on the scheduled FTP task (top) then right click on the first transfer (bottom), select "properties", select an overwrite option, ok, Update...
8: Exit the task scheduler.
In order for scheduled FTP tasks to run, the following rules may apply:
1: The computer must be turned on.
2: The MS task scheduler must be enabled (running by default unless disabled).
3: If you are running NT4/200x/XP, make sure you have the proper permissions to run scheduled tasks. The user usually will require a password. Depending on your setup, the computer's network name may not be required (ie: No COMPUTERNAME\USER, just the USER)...
4:
Windows 7 users may need to change the AT Service Account Configuration
Start - All Programs - Accessories - System Tools - Task Scheduler - Action menu - AT Service Account Configuration - click "Another user account: (your account)" - Change User, select your account if not selected, enter your password, OK
You may additionally have to re-create your scheduled task as an administrator by right clicking on the Core FTP desktop icon, and selecting "run as administrator".
5: Domain accounts should use file based storage (View - Options -> Data -> Use default configuration file), and the "Specify data storage directory" option pointing to a local directory on the computer running the task. Exit Core FTP, "run as administrator" when setting these options.
6: If task is not running and "admin mode" is off, click on the button next to it to turn it on.
7: If task is running but transfer not occurring, right click on a task (at the top in the list of tasks) select properties, then "run with highest privileges"
A reminder: The user and password you enter are for your account on the local computer, not your FTP server information - that information is already setup in your transfers)...
NT 4.0 Notes (does not apply to Windows 200x/XP):
1: It is recommended you use the ANSI version of Core FTP.
2: The 'offline browsing pack' must be installed from within Internet Explorer setup.
Wildcard support:
Queue up only *one* transfer for each wildcard type you would like to use (as above, in steps #1 and #2).
Once you are in the scheduler, right click on the transfer, select properties:
Now change the existing filename to the wildcard you wish to use (i.e. *.jpg).
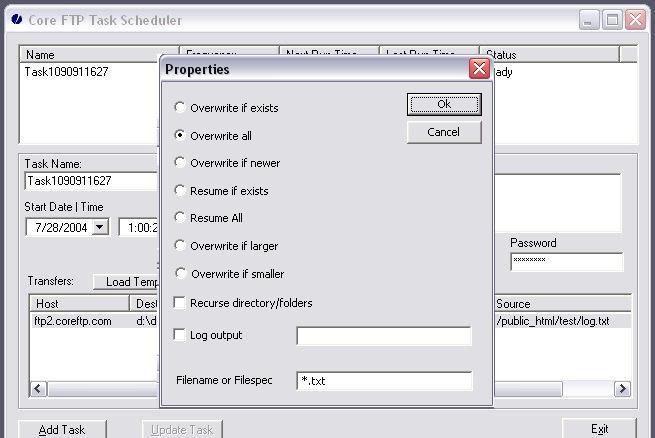
(In versions with the destination filename, this field should be blank)
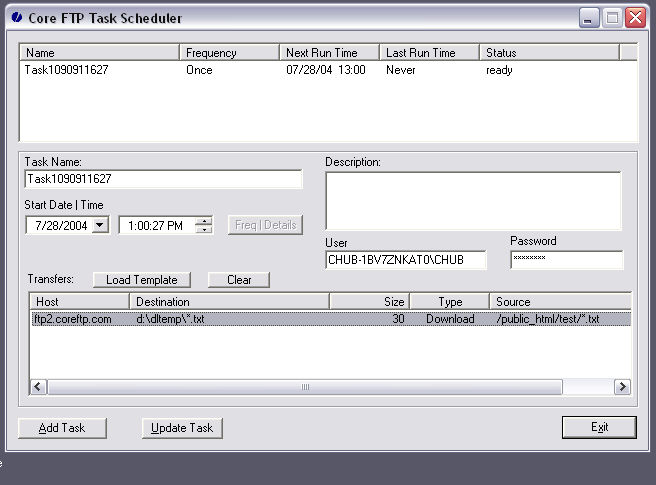
Hit OK. You will see the updated wildcard specification that will be used for this scheduled item.
* Note: With previous versions of Core FTP you may need add a new task for the changes to take effect.
To see changes to the display, hit F5 to refresh.
Logging output to a file:
If a scheduled task does not appear to be working, use the log option to help identify the problem.
Click on the task (top list), then right click on the first transfer (bottom list), select "Properties".
Check the "Log output" option, and enter a filename to an existing path (ie: c:\existing_path\sched.log).
Hit "Ok", then "Update".
The next time a sceduled task is run, a log file should be created. When requesting support for scheduled tasks, please include a log file
in order to help diagnose errors in a timely manner.
Setting up a task to run every x minutes:
Go into Core FTP Task Scheduler, click on the task, then hit "Freq:Details"
Next you will see the advanced scheduler settings for the task, which will allow you to set up the task to repeat at almost any given frequency:
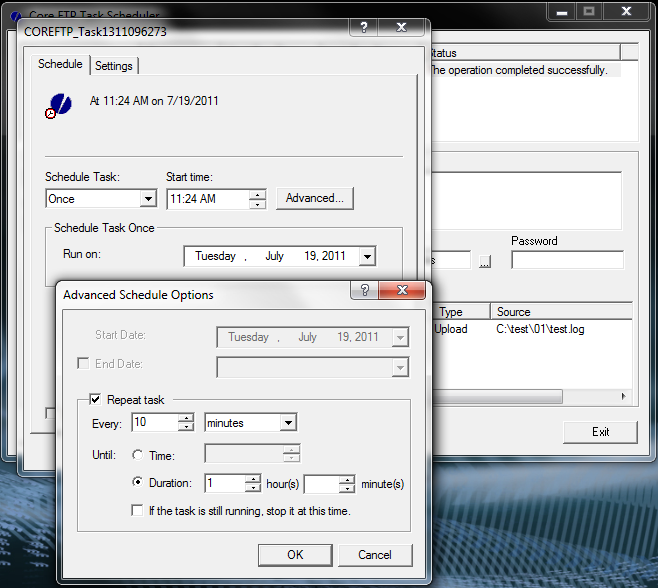
Enter in the frequency (once, daily, weekly, monthly) from the drop down labeled "schedule task".
Enter the start time you wish to start the task (if it is different than the original), and then click advanced.
Check "Repeat task" and enter the time frame that you would like the task to repeat.
The duration field will be for the period of time the task should keep repeating...
Hit "ok" to update (you may be prompted to enter your password again).
Scheduling functionality is not available in the "Lite/LE" edition of Core FTP.
Schedule FTP Transfers